In the last part of this two-part PHP programming tutorial, we learned how to access a git repository, how to clone a git repository, add PHP code to a directory, and push that code from git to Microsoft’s Azure DevOps. Today, we are going to continue building upon that knowledge, as we work with Azure DevOps’ Work Items and further learn to use git repositories and Azure DevOps in unison, all while examining some PHP code to make all of that happen. We have a lot to learn, so let’s get started!
Before we do, however, be sure to read the first part of this series: Working with PHP, Git, and Azure DevOps.
Using Azure DevOps’ Work Items
Depending on how an organization’s security policies within Azure DevOps are configured, it may not be possible for a developer to create a new work item. This task may have to be undertaken by a manager.
A brief note: depending on how an organization’s security policies within Azure DevOps are configured, it may not be possible for a developer to create a new work item. This task may have to be undertaken by a manager.
One of the nice features of Visual Studio is its ability to automatically tie Work Item ID numbers to pushes from within that application. This can still work for non-Visual Studio projects, except that the association needs to be made manually. While it is an extra step, it is still a good practice to tie specific work items to specific commits so that development work can be properly tracked.
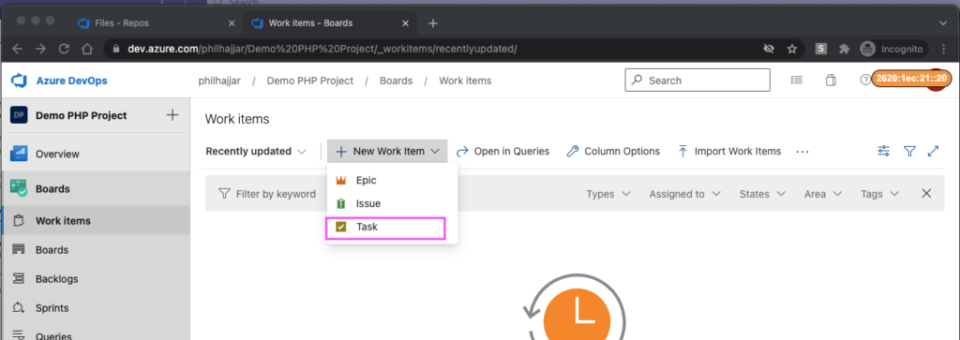
Consider a trivial example of a new work item to uncomment the code in phpinfo.php. In Azure DevOps, create a new Work Item by clicking Boards → Work Items. Then, click the New Work Item button. For the purposes of this example, a new Task will be created, as seen here:
Figure 1 Creating a New Task in Azure DevOps
The standard screen for entering a new Task’s information is below, with comments entered and the Save button highlighted:

Figure 2 Entering the new Task’s information
In this case, the new Task receives an ID of 1 after the Save button is clicked:

Figure 3 The new task
Perform the proper task status updates and assignments for the sake of formalities. The assignment, status update, and Save button are now highlighted below:

Figure 4 Properly assigning the new Task
Now back to the code – even though this is a new project, it is a best practice to invoke a git pull before making any changes. Note how the password is required once again:

Figure 5 Pulling the most recent version of the code
Note that, depending upon how distributed the project is, and what outstanding uncommitted changes may be out there, a simple git pull may not be the best strategy, as per the hints given above.
Now the code in the phpinfo.php file can be modified. For this example, the file was modified using the vi editor with the // before the phpinfo() command removed, as shown with the highlight below:

Figure 6 Uncommenting the one line of code and showing a git status
Note how invoking the git status command shows the one file which has been modified. As a best practice, the git status command should be invoked on a regular basis to make sure only the files which are intended to be modified are indeed modified.
Now, add and commit the change using the git commit -a command, and complete the required commit message:

Figure 7 the commit message for Task 1
Note: git commit -a, by default, commits all the changed files. This may not be the desired behavior, and if this is the case, a different approach should be used.
The following screen appears once again upon saving and exiting the editor:

Figure 8 the result of the successful commit
And lastly, the push:

Figure 9 Pushing the change to the repo
Now the commit ID needs to be copied from the Azure DevOps Project site so that it can be associated with the Work Item. This can be done by getting the Commit ID directly, however it is also possible to use Azure DevOps to provide the Commit ID, as shown in the previous part of this series.
Reading: The Repository Pattern in PHP
Optional—Get the Commit ID Directly
In the Project site, click on Repos → Commits. For the most recent commit, move the mouse pointer to the right of the column so that the vertical 3 dots appear. Then, click on the 3 dots and select the Copy full SHA option, as shown in the highlighted areas below:

Figure 10 Getting the Commit ID
Copying the full SHA copies the full Commit ID to the Clipboard.
Using Azure DevOps to get the Commit ID
Back in the Work Item, select the Add Link option (or select the commit link under it, if it is present). Both are highlighted in purple below:

Figure 11 Preparing to enter the Commit ID
For the Link Type, select Commit:

Figure 12 Selecting the Link Type
To get the Commit ID, click the “…’ button on the right, as highlighted below:
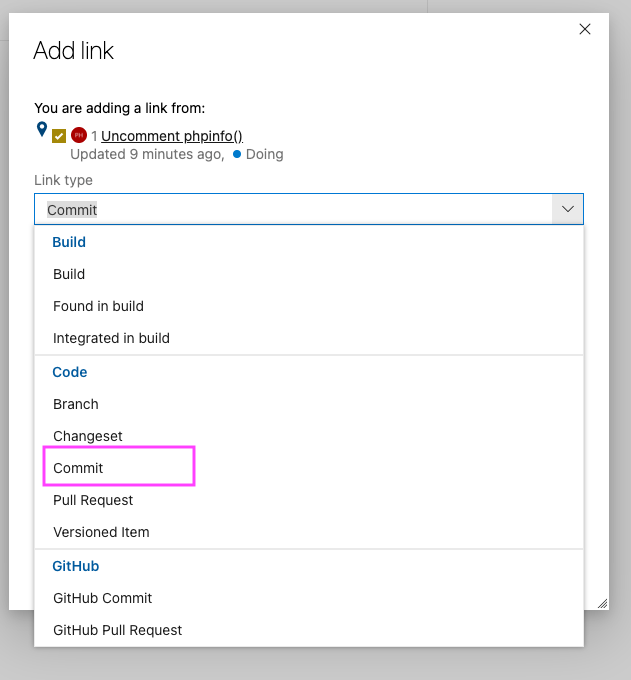
Figure 13 Getting the Commit ID
Choose the appropriate Commit ID from the listing. The Copy button for this example is highlighted. Once the appropriate Commit ID is selected, click the Copy button Do not click the “OK” button!
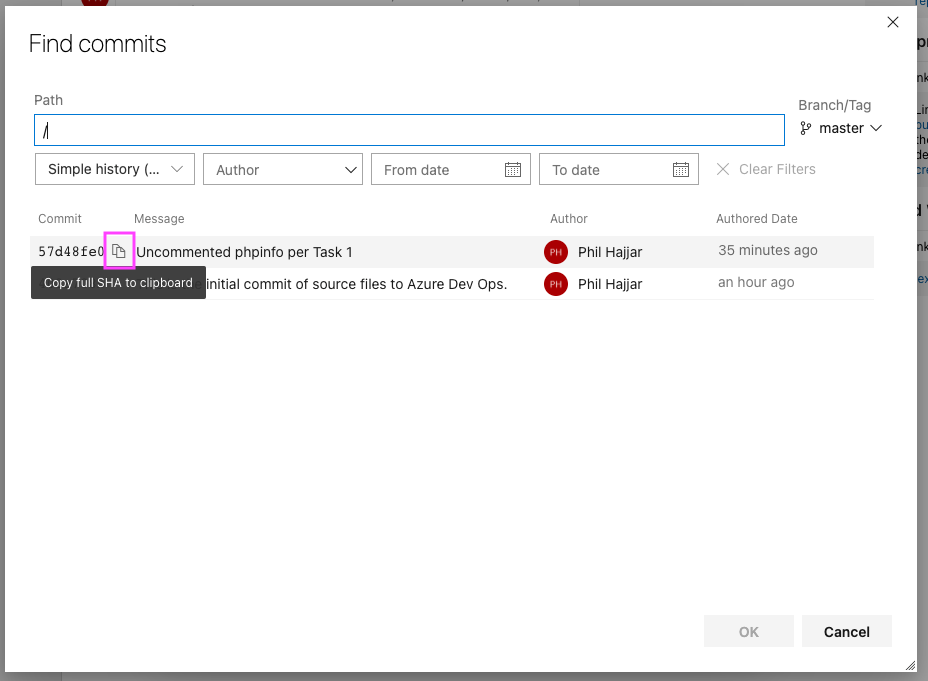
Figure 14 Finding and copying the Commit ID
Click the Cancel button and paste the Commit ID that appears in the Add Link dialog:

Figure 15 The Applied Commit ID
Click the OK button to add the link. Note that it may be necessary to go refresh the Work Item page to see the addition:
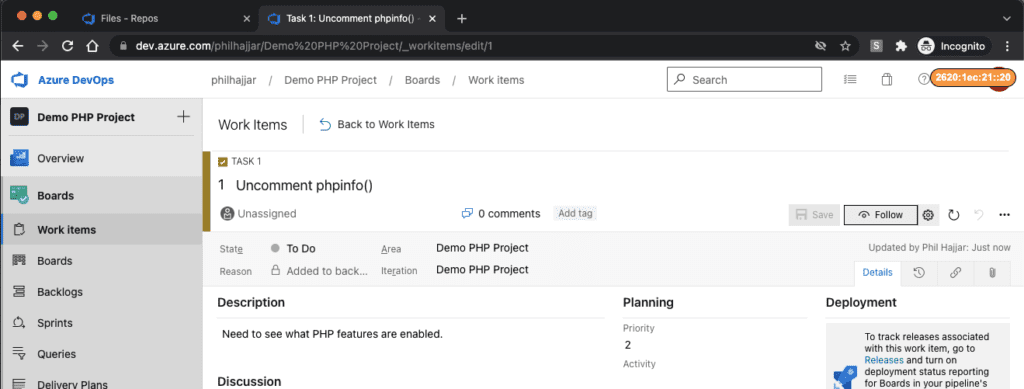
Figure 16 The added link.
If the screen above changes to the page that shows the commit, then the link will not be added, and the process will need to be repeated.
As with Visual Studio, any number of commits can (and should) be associated with the task, so that proper auditing procedures are respected. This task can now be properly closed out as completed. It can be tracked like any other work item in Azure DevOps.
Reading: Using PHP for System Administration
Conclusion to Using Azure DevOps’ Work Items
While this PHP, git, and Azure DevOps tutorial series likely bends the already steep learning curve for Azure DevOps up a bit, it does present an important mechanism that this Microsoft offering provides so that non-Visual Studio projects can be properly managed. There are no limits to what kind of code can be used here, and there is no reason that alternative git clients could not be used either. The developer additionally gains the advantage of being able to use a single solution to organize all repositories for a multitude of projects, as opposed to having to have special custom repositories for different projects depending on the development environment used to create them.
read more PHP software development and programming tutorials.