Most programming language tutorials focus on “traditional” applications which stop execution at a certain point and wait for input from a user. This type of input is called a blocking input, in the sense that it blocks further execution of a program until a user does something to satisfy the input directive. While this sort of processing may be useful for utility scripts, it is completely useless for applications which need to do something else while waiting for user input. Computer games, for example, would be rather boring if they stopped all of the action while waiting for a user to do something.
A demonstration of how non-blocking input works can be found in our tutorial: Using Python for Basic Raspberry Pi Electronic Controls – specifically in the section called “GPIO Input in Python: Example.” This demonstration shows input being read from momentary switches while the code continues to run.
The code examples demonstrated in this programming tutorial series will use Python 3.9.2 and run on a Raspberry Pi 4 Model B (which you can purchase from the included link); however, this code should be portable to almost any Linux system which supports Python 3. To that end, this guide will include demonstrations of code in a Kali Linux environment running Python 3.9.12. The reason for choosing the Raspberry Pi as the primary demonstration device has more to do with extending the functionality of this code in a future article.
Platform dependent code
In this day and age, the idea of writing something once and running it on anything is so ingrained into most programmers’ minds that even entertaining the thought of writing platform-specific or operating system-specific code to do anything feels like heresy. However, things like keyboard and mouse input are handled at a very low level in any Operating System. Even if one were to use a (relatively) platform-agnostic language such as Java or Python to intercept such input, the code to handle these tasks would have to perform in very different ways to achieve the same goals.
Even software libraries or modules which attempt to abstract out these tasks across multiple environments (an environment being defined as a combination of an Operating System and the hardware on which it runs) would, under the hood, have separate code for each environment where the code is expected to be used.
Local code and non-blocking input
Another “fundamental” comfort that many programmers can become spoiled with is the idea that one can run code remotely and it functions no differently than running code on a desktop or laptop. When working with non-blocking input, this comfort is usually thrown out the window. When one is connected to a remote computer via SSH or VNCthe keyboard, mouse or game controller events on the local computer are not typically transferred as events on the remote computer, so running any of the demonstration code presented here over any sort of remote connection is not likely to work.
Working with Python, Input Devices, and Linux
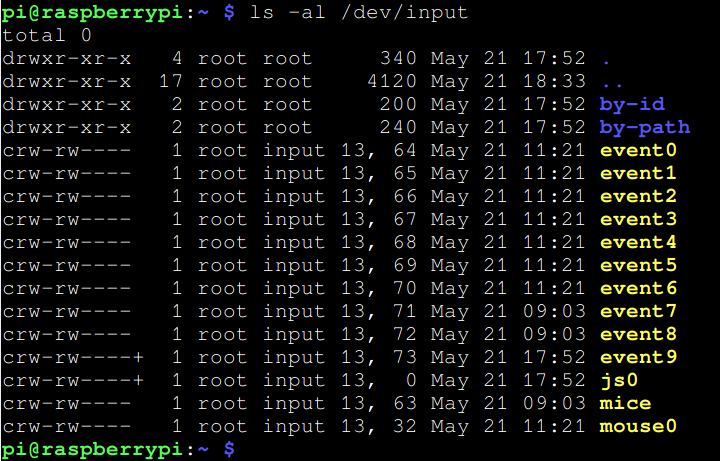
In Linux, the data that is created by any kind of input device is written to a character device file stored in the /dev/input directory. The contents of this directory vary from one Linux system to the next, but the files have the same general structure, as shown in the image below:
Figure 1 – Input Device Listing in Raspberry Pi OS
This image shows the same location, but in Kali Linux:
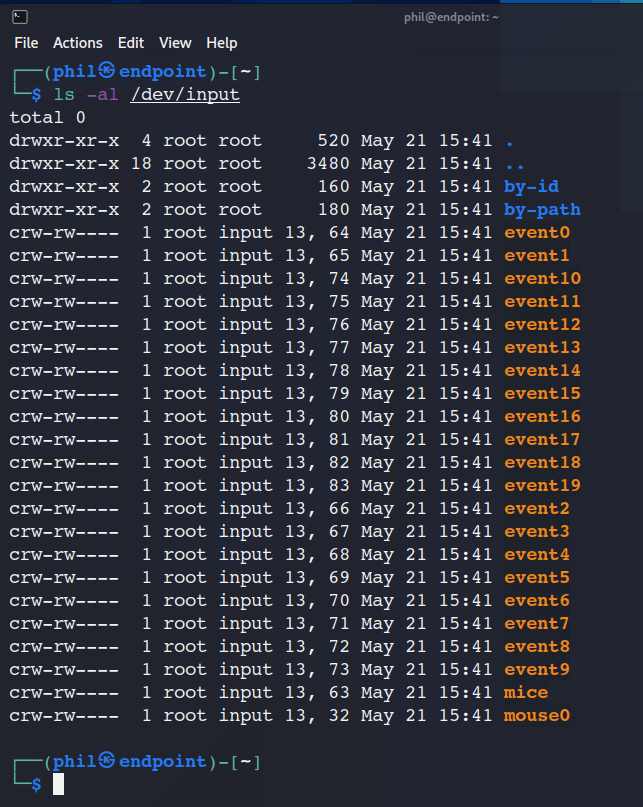
Figure 2 – Input Device Listing in Kali Linux
An important note: All character device files in Linux will have a “c” prefix in place of the usual “-” prefix when they are listed via the ls -al command.
Now, of course, this begs the question: how does one connect a particular input device, such as a keyboard, to a particular file?
Reading: Basic Electronics Control with the Raspberry Pi
Device Identification in Python
This is answered in the file /proc/bus/input/devices. Below is one possible instance of this file:
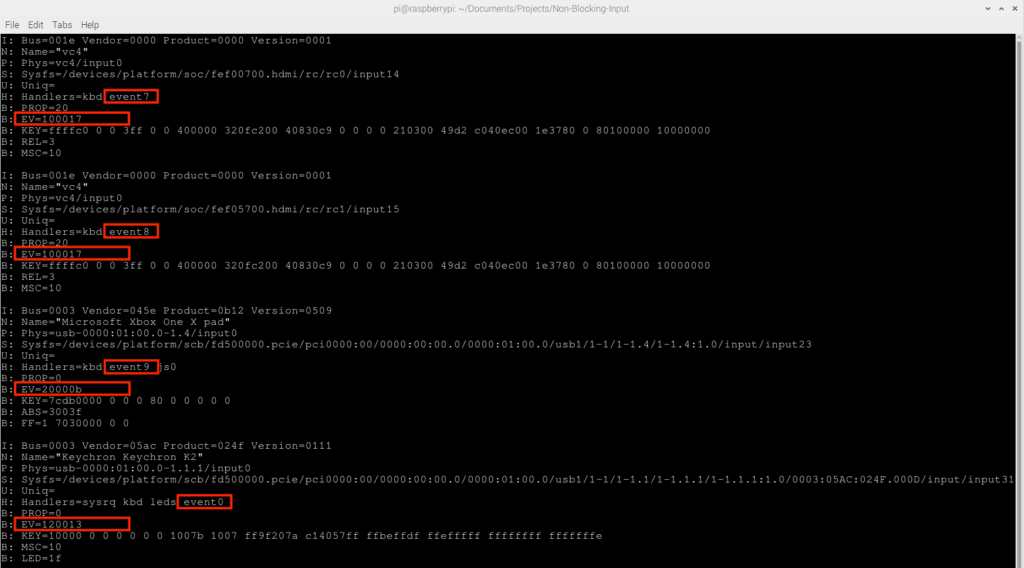
Figure 3 – Sample /proc/bus/input/devices file with EV lines and event file names highlighted
The highlighted sections represent the EV line and event filenames. The EV line tells Linux what sorts of input events the device provides. The short explanation for connecting the /proc/bus/input/devices file to the keyboard is the code EV=120013. This is a hexadecimal number that represents a device that is, at a minimum, keyboard input.
The part of this that connects the device to the actual file is the eventX value. For the example above, the keyboard itself with EV=120013 corresponds to the file /dev/input/event0.
Note: There can be multiple devices with keyboard in their names, as well as multiple devices with code EV=120013, which are not keyboards. The demonstration code presented later will attempt to discern which of these devices are actually keyboards.
Reading Character Device File Data
Since the file /dev/input/event0 works like a “regular” file, it can be read using the command sudo cat /dev/input/event0.
The output changes each time a key is pressed. Each keypress represents multiple events. Depending on what the user is doing, there are usually 4 events associated with pressing and releasing a key. There can be more events created if multiple keys are pressed or held down. Each such action results in raw event data being written to this file. Being raw and unfiltered binary data, this is clearly not useful for anything without some additional processing.
Reading: Using Python for Basic Raspberry Pi Electronic Controls
Event Details in Linux
The size of a Linux event is environment-dependent, and the best way to calculate it is to use a C++ program to read the Linux Header files and print out the size. This value can then be used in a Python script, or used to properly build a Python struct that can hold binary event data.
There is not an easy way to do this in Python, as the Linux Header files are intended to be read by C or C++ source code directly. However, all of the information in these files can be extracted for other uses.
The image below shows the definition of an input event, specified in a C header file located at /usr/include/linux/input.h, with the specific definition highlighted in red:
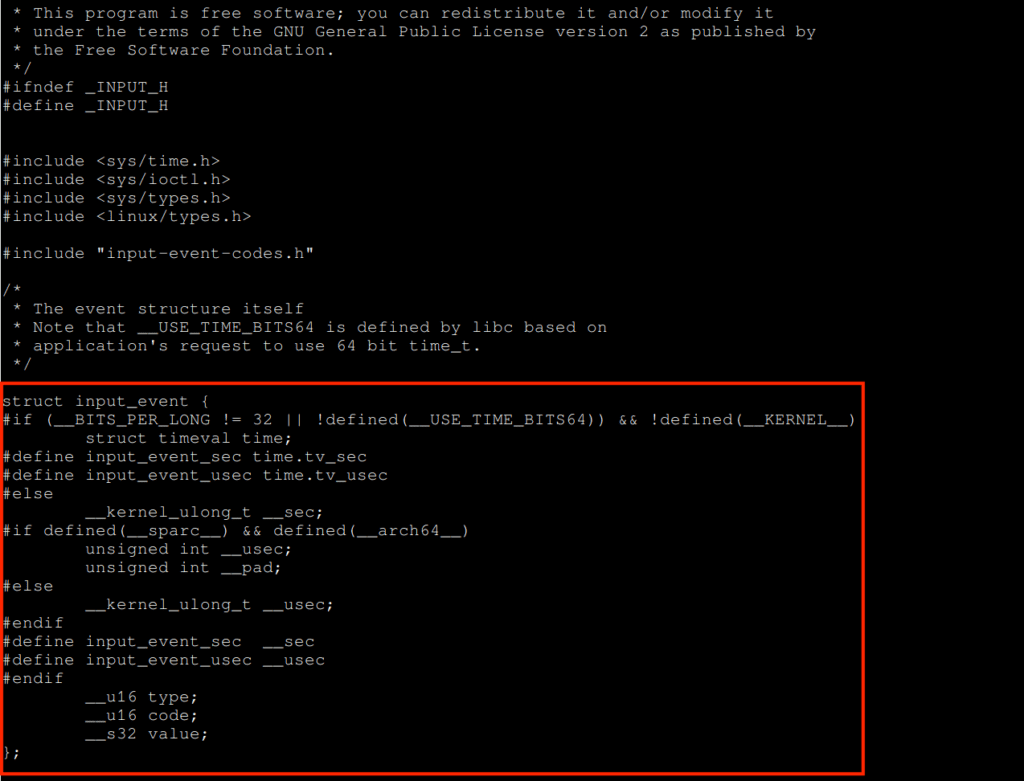
Figure 4 – C Header File containing input event definition
In the C programming language, an event is broadly defined using the following data components:
- The date and time at which the event occurs, down to the microsecond.
- The type of event. Event Types are defined as C numerical constants in /usr/include/linux/input-event-codes.h.
- While this section of the article focuses on Keyboard Events, all other input events are defined in this file as well.
- The event code, which in the case of a keyboard event, corresponds to the key pressed or released.
- The key codes are also defined in /usr/include/linux/input-event-codes.h.
- The value of the event, which in the case of a keyboard event corresponds to the key being pressed and the key being released.
- This refers to the action of pressing or releasing the key.
The most reliable way to calculate the size of an event is to use a C or C++ program to instantiate an input_event structure and directly read its size, as shown in the C++ code below:
// get-sizeof-input-event.cpp #include #include using namespace std; // Use the definition of an input_event structure in /usr/include/linux/input.h // to create an instance of that structure. struct input_event event; int main(int argc, char *argv[]) { // Calculate the size of that instantiation of that structure. int eventSize = sizeof(event); // Print this information to the console. cout << "The size of an input event is [" << eventSize << "] bytes." << endl; return 0; } Listing 1 - C++ Code to evaluate the size of an input event.
C/C++ code must be compiled before it can be executed. This is done using the g++ compiler, which is usually included in most Linux installations. By default, this compiler will name a successfully compiled C/C++ executable a.out and give it executable permissions: Figure 5 – Compiling and running the C++ code to get the size of an input event. Note: The event size can vary from one Linux environment to another. Do not hardcode a particular event size, instead, always calculate it. Now that we have successfully gathered our information, thanks to our handy C++ code, we can write some Python scripts to intercept and capture this data so that we can use it in a program. The walkthrough of that Python code takes place in the second part of this series, which you can find here: Reading Keyboard Events with Python.
Final Thoughts on Non-Block Input in Python