There are a number of languages that programmers can use to interact with a deployed Ethereum Virtual Machine (EVM) compatible contract. Of those languages, the most popular are Python and JavaScript.
JavaScript is the most used programming language when it comes to working with Ethereum contracts and, in fact, the Python libraries are based on them. This programming tutorial will use JavaScript for that reason.
Popularity is not the only reason why you should use JavaScript. The biggest reason is that JavaScript is the front-end language for the web. Additionally, JS libraries are regularly maintained and developers can easily get support online in case you run into an issue.
Reading: Top Online Courses to Learn JavaScript
Ethereum JavaScript Libraries
There are two popular JavaScript libraries that developers can use to work with Ethereum tokens: web3.js and ethers.js. We will use the ethers.js library in this tutorial.
According to their official documentation, the “ethers.js library aims to be a complete and compact library for interacting with the Ethereum Blockchain and its ecosystem.”
The library offers a number of features, including: safe storage for your private keys, a very small size (<500kb as of this writing), and the project is also open source.
How to Setup ether.js
To begin, you first need to install the ether.js library. To do so, simply use the node package manager, using the command below:
$ npm install –save ethers
Next, ensure that you have node.js ( a runtime environment for JavaScript applications outside of the browser). If you do not have it installed, you can get it using the official site here. We recommend that you install at least v16.0.
Working with ether.js providers
Ether.js provides developers an abstraction of the Ethereum blockchain that it refers to as Providers. Providers is a class programmers can use to access useful information such as the current block number or timestamp.
There are a number of API service providers that developers can connect to using the ethers library in order to access whatever blockchain service you need; the ethers.providers class enables you to connect to them.
The popular API providers are:
- Etherscan: A blockchain explorer for Ethereum
- Alchemy: A popular freemium Web3 service provider
- INFURA: Just like Alchemy
Programmers can create an instance of any of these providers using the EtherscanProvider(), AlchemyProvider(), and InfuraProvider() methods, respectively.
All of these classes take in a network argument and, optionally, an API key. To access higher rate limits, you can sign up for an API key from any of the mentioned API providers.
Here is a code example showing how to create a provider in JavaScript:
// creating a provider const NETWORK = “homestead”; const provider = new ethers.providers.AlchemyProvider(NETWORK, API_KEY );
Working with Signers in ether.js
A signer is a class that provides authorization for making certain transactions from your account(s). Some of these transactions include sending tokens or signing a message to indeed prove that you are the owner of a certain public address.
You can create a signer either by using your private key or the mnemonic words of your wallet. A wallet can have multiple accounts, each with its own private key. For security purposes, it is advisable for you to use your private key when creating a Signer. If you are using the Metamask wallet, you can access your private key from the instructions on their page. Here is an example of how to use a Signer:
const signer = new ethers.Wallet(PRIVATE_KEY, PROVIDER);
There are cases, however, when you might need to use your mnemonic key instead. A good example is when you want to use multiple addresses from your wallet. Here is an example of how to use mnemonic keys in JavaScript:
// word1 word2.. are the mnemonic words of your wallet const signer = new ethers.Wallet.fromMnemonic(‘word1 word2 word3 …’, `m/44’/60’/0’/0/0`);
In the above example, m/44’/60’/0’/0/0 defines the path for your first account. This is the default. In case you wish to access another account, simply change the last digit. For example, to access account 18, use m/44’/60’/0’/0/17.
The Signer class provides a number of useful member methods for working with your account:
- getBalance(): Returns the balance of the account for a block. If no parameter for the block number is indicated, then it returns the balance at the latest block height.
- getAddress(): Returns the address of the signer.
- getChainId( ): Returns the chain ID of the network that the wallet is connected to.
- signMessage(message): Returns a cryptographic signature for the given message using the private key of the signer.
Reading: Top Online Courses to Learn HTML and CSS
Working with ether.js Contracts
Here is an example of a Contract definition in ether.js:
const contract = new ethers.Contract( CONTRACT_ADDRESS , abi , signer );
Example of Interacting With a Deployed Smart Contract
The JavaScript program below gets price data for Bitcoin and Ethereum from the Chainlink data Oracle; Chainlink is a decentralized data aggregator that is built on the Ethereum blockchain.
Chainlink can be used to get data about cryptocurrency pairs, forex pairs, weather forecasts, sports and so on. This example below will show you how to get the price data for ETH/USD and BTC/USD pairs.
First, you need to include the ethers.js package using require(). Next, you need to include the Application Binary Interface (ABI) for each contract. An ABI defines the functions that the Solidity compiler will use when interacting with a deployed smart contract.
One feature of using an ABI is that you can use it to interact with a deployed contract using any programming language. You can generate the ABI of Solidity code from a Solidity editor like Remix.
Let’s see how you can get the ABI of the Chainlink’s price data aggregator.
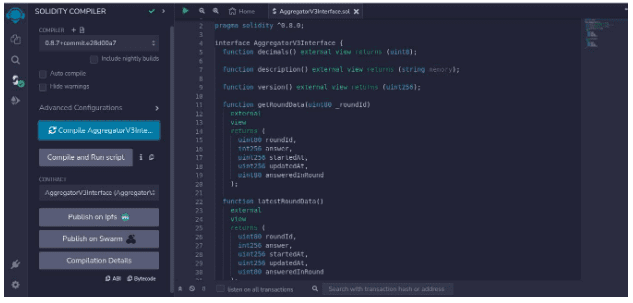
First, get the interface for Chainlink’s price feed aggregator on their Github repository. In the Remix editor, create a file named AggregatorV3Interface.sol and paste the code from the interface.
From the side panel of the editor, go to the Compile tab. Press the Compile AggregatorV3Interface button.
After compilation is complete, you can now copy the ABI from the button at the end of the side panel. Now, paste the ABI into a local JSON file named pricedata.json. Your ABI file code should look like the one below:
[
{
“inputs”: []”name”: “decimals”, “outputs”: [
{
“internalType”: “uint8”,
“name”: “”,
“type”: “uint8″
}
]”stateMutability”: “view”, “type”: “function” }, { “inputs”: []”name”: “description”, “outputs”: [
{
“internalType”: “string”,
“name”: “”,
“type”: “string”
}
]”stateMutability”: “view”, “type”: “function” }, { “inputs”: [
{
“internalType”: “uint80”,
“name”: “_roundId”,
“type”: “uint80″
}
]”name”: “getRoundData”, “outputs”: [
{
“internalType”: “uint80”,
“name”: “roundId”,
“type”: “uint80”
},
{
“internalType”: “int256”,
“name”: “answer”,
“type”: “int256”
},
{
“internalType”: “uint256”,
“name”: “startedAt”,
“type”: “uint256”
},
{
“internalType”: “uint256”,
“name”: “updatedAt”,
“type”: “uint256”
},
{
“internalType”: “uint80”,
“name”: “answeredInRound”,
“type”: “uint80″
}
]”stateMutability”: “view”, “type”: “function” }, { “inputs”: []”name”: “latestRoundData”, “outputs”: [
{
“internalType”: “uint80”,
“name”: “roundId”,
“type”: “uint80”
},
{
“internalType”: “int256”,
“name”: “answer”,
“type”: “int256”
},
{
“internalType”: “uint256”,
“name”: “startedAt”,
“type”: “uint256”
},
{
“internalType”: “uint256”,
“name”: “updatedAt”,
“type”: “uint256”
},
{
“internalType”: “uint80”,
“name”: “answeredInRound”,
“type”: “uint80″
}
]”stateMutability”: “view”, “type”: “function” }, { “inputs”: []”name”: “version”, “outputs”: [
{
“internalType”: “uint256”,
“name”: “”,
“type”: “uint256″
}
]”stateMutability”: “view”, “type”: “function” } ]
Next, you need to get the address of the deployed smart contract. You can find the contracts for Chainlink’s price feeds for the Ethereum network (testnet or mainnet) here. In this tutorial, we will use the contracts for Goerli tests net.
Finally, you can now get the latest price data using the latestRoundData() function defined in the Chainlink’s price feed aggregator interface.
const { ethers } = require(“ethers”); const abi = require(“../pricedata.json”); const ETH_CONTRACT_ADDRESS = “0xD4a33860578De61DBAbDc8BFdb98FD742fA7028e”; const BTC_CONTRACT_ADDRESS = “0xA39434A63A52E749F02807ae27335515BA4b07F7”; const API_KEY = “”; const PRIVATE_KEY = “”; const network = “goerli”; const provider = new ethers.providers.AlchemyProvider(network, API_KEY ); const signer = new ethers.Wallet(PRIVATE_KEY, provider); const ETHcontract = new ethers.Contract( ETH_CONTRACT_ADDRESS , abi , signer ); const BTCcontract = new ethers.Contract( BTC_CONTRACT_ADDRESS , abi , signer ); getLatestPrice(BTCcontract); async function getLatestPrice(contract){
[
/* uint80 roundID */,
price,
/*uint startedAt*/,
/*uint timeStamp*/,
/*uint80 answeredInRound*/
] = await contract.latestRoundData(); let decimals = await contract.decimals(); let info = await contract.description(); let decimalPrice = price.toString() * (10 ** -decimals); console.log(“Price: ” + decimalPrice); console.log(info); }
Final Thoughts on JavaScript and Ethereum Contracts
This tutorial has shown you how you can interact with Chainlink’s price feeds. The steps are replicable for other Ethereum smart contracts as well.
You can put your newly learned skills to the test by swapping coins using the Uniswap protocol. Remember, you need the ethers.js library, the address for the contract, its ABI, and the contract’s interface to enable you to know which functions you can call.