The Raspberry Pi device has proven to be a very useful “entry-level tool” for aspiring programmers, engineers and hobbyists who are looking for inexpensive, but high-quality hardware to experiment with.
However, when paired with the high-performance Raspberry Pi OS (formerly known as Raspbian), this device can do almost anything any Linux-enabled computer can. The focus of this article is to demonstrate how a Raspberry Pi device for less than $ 50 can be used as an OpenVPN server that enables secure remote connections to a private network. The Raspberry Pi device already has all the necessary hardware, so that the starting shot is a quick and, figuratively, painless process.
Advantages of Raspberry Pi for developers
The biggest benefit to using a Raspberry Pi device for this purpose is the cost. The device used for this article, along with the case, micro SD card, and some accessories, came to around $ 100 – and even that can be reduced significantly if necessary.
Another great benefit of this setup is taking advantage of the security that Linux offers. Like all modern Linux distributions, the Raspberry Pi operating system is regularly updated with security-relevant patches that reduce security concerns. This allows the end user to update and patch the software as needed. Compare this with many routers that offer integrated VPN server functionality. End users using this functionality have been left with the manufacturer of their router for these updates, and they may not arrive in a timely manner. If there really is a major security issue related to OpenVPN or the Raspberry Pi OS, disconnecting the network will end the threat without disturbing other users on the network.
Read:The 6 best Python IDE and code editors
First steps with the Raspberry Pi OpenVPN server
The following hardware was used for this demonstration:
- Raspberry Pi 4 with 4 GB RAM
- A 64 GB micro SD card and a suitable reader / writer for it
- A router or gateway that enables port forwarding
The Raspberry PI operating system can be written to the micro SD card using an installation program available from the Raspberry Pi website at https://www.raspberrypi.com/software/. Once the operating system has been written to the card, it can be configured on the Raspberry Pi device by inserting the card into the device, turning it on, and then following the on-screen instructions to complete the configuration. The software is not “installed” as it runs directly from the micro SD card. As soon as the configuration is complete, the software boots directly into the graphical user interface of the Raspberry Pi OS. All commands are entered via the terminal.
This demonstration is also based on the assumption that your ISP allows incoming connections on high numbered ports. Most home ISPs – and many business ISPs by default – block incoming connections on most low-numbered ports, but do not impose such a restriction on higher-numbered ports (typically 50000 and above).
Read: First steps with the Raspberry Pi
Download the OpenVPN server installer
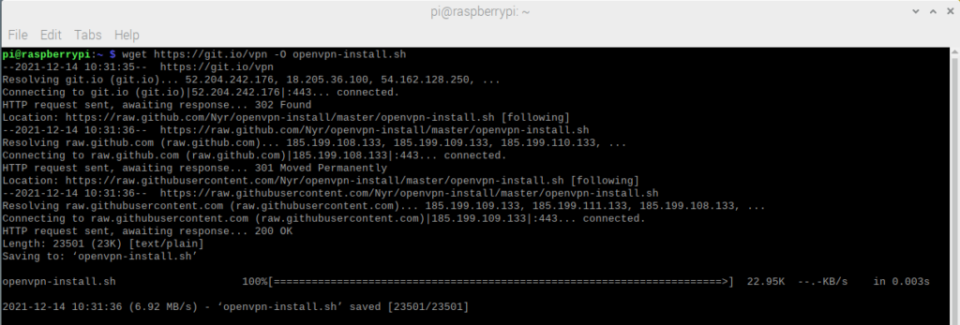
The OpenVPN server is managed via a public GitHub repository. To download it use the command:
[email protected]: ~ $ wget https://git.io/vpn -O openvpn-install.sh
Note that this file will be downloaded to the Pi user’s home directory and all further work will be performed from this directory.
Figure 1 – Download the installation script
Considerations for the security of the Raspberry Pi OpenVPN server
Before starting the OpenVPN server installation, it is important that some very generous standard settings are corrected in the installation script. For example, the standard validation period for both the server and client OpenVPN SSL certificates is ten years. This is clearly unacceptable, even for an experimental endpoint setup, let alone a production setup.
Since the openvpn-install.sh script hard-coded the ten-year interval as 3650 days, the easiest way to correct this is to open the openvpn-install.sh script in a text editor and search for all instances of “3650” That can be used as a timeline for the expiration of the certificate and change it as needed. The following expiration dates are used in this demonstration:
- Server – 400 days
- Individual customers – 30 days
These can of course suit individual tastes, but it is better to stay on the conservative side, “just in case”.
Note that the value for EASYRSA_CRL_DAYS is not used for the validity period of SSL certificates and does not need to be changed.
The first two images below relate to the initial installation of OpenVPN:

Figure 2 – Before You Make Changes – Default Server and First Client File Expiration Date is Ten Years!
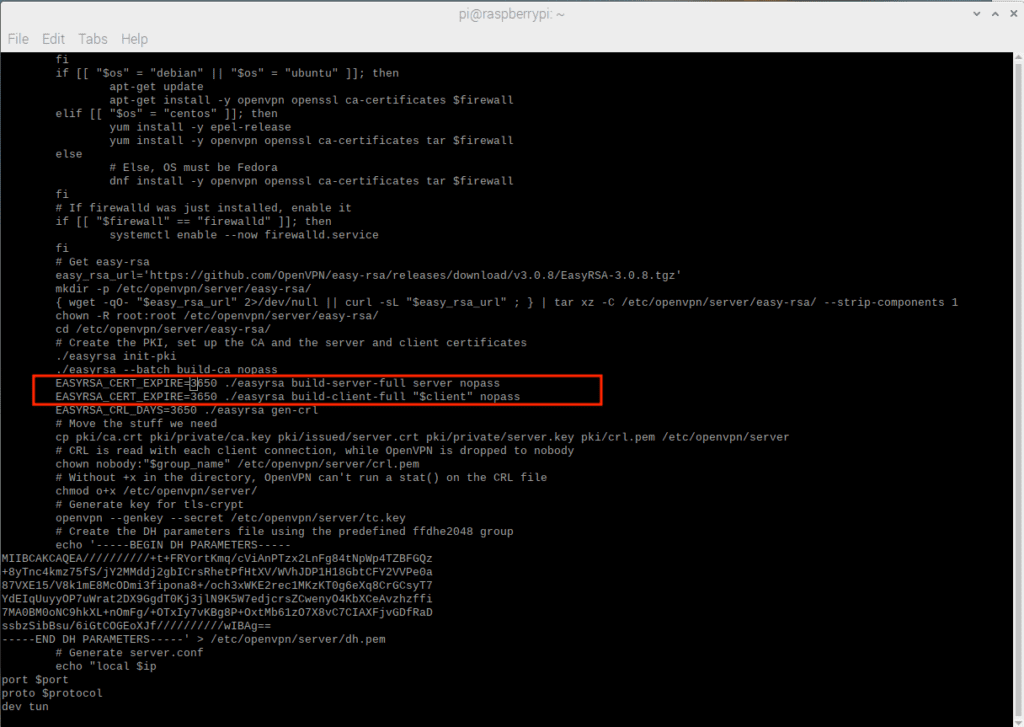
Figure 3 – After making changes – default server and initial client file flow are more reasonable
The next two numbers relate to new customer acquisition:
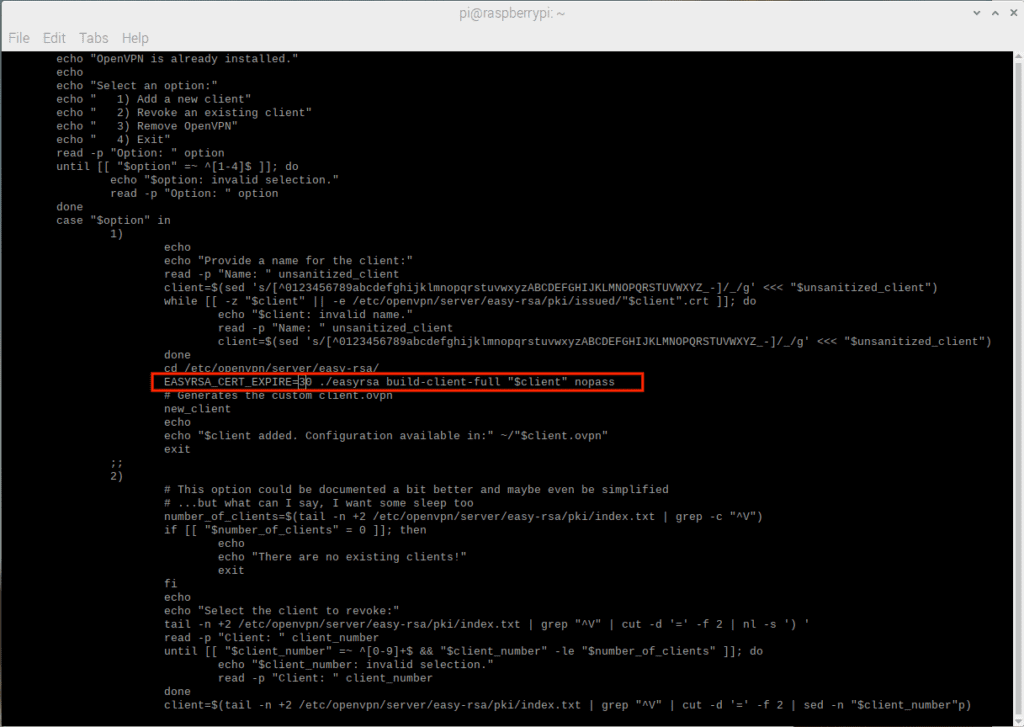
Figure 4 – The standard process for new customers is also ten years!
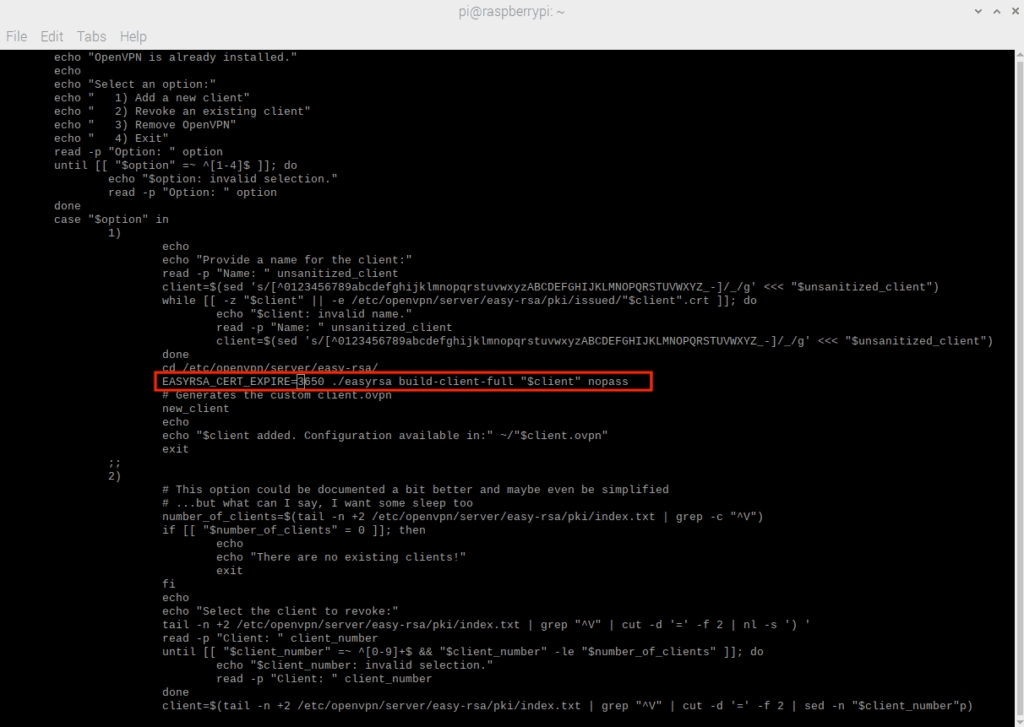
Figure 5 – Standard flow for new customers is more reasonable
Read: Programming the Raspberry Pi
Other considerations about OpenVPN
In addition to the expiry time of the SSL certificate, it is also important that the system time on the Raspberry Pi device is configured correctly. This includes the time zone, the time itself and whether the time itself is automatically updated (it should be!). The Raspberry Pi OS does a good job of ensuring that the system time is configured correctly, but if this demonstration is used for another Linux distribution it may not be.
Finally, the Raspberry Pi OS should be updated like any other Linux distribution:
[email protected]: ~ $ sudo apt update && sudo apt upgrade
Install OpenVPN on Raspberry Pi
It is likely that the installation script itself is not executable, this can be fixed with a chmod call:
[email protected]: ~ $ chmod + x openvpn-install.sh
As soon as the correct permissions are set, the installation script can be called. It has to be run as root:
[email protected]: ~ $ sudo ./openvpn-install.sh
Server remote IP
The first prompt asks you to confirm the router’s public IP address. This shouldn’t need to be changed. However, if the network is using some form of dynamic addressing for its external address, then using a dynamic DNS service to map the current IP to a host name and then entering that host name into this prompt may be a consideration. If you just want to keep the current IP address unchanged, just confirm the existing entry.
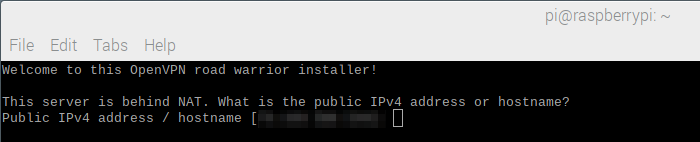
Figure 6 – Remote IP entry with current pixelated IP address
Server log
When selecting the protocol, this should almost always be set to UDP (User Datagram Protocol). In some cases an ISP may block incoming UDP and if so, TCP must be selected. Using TCP over UDP has a performance impact.
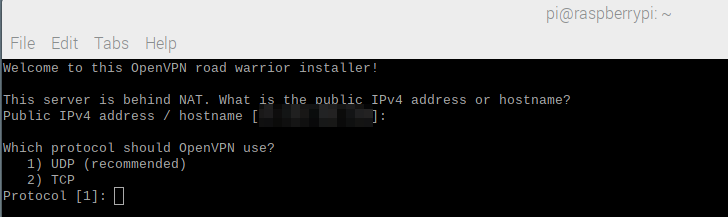
Figure 7 – Protocol selection
Server port
While it is possible for the default port 1194 to be open, it is likely that a port with a higher number will need to be selected. Note the use of 51194 for the port. In addition, the router or gateway that provides the Internet connection must be configured in such a way that it forwards port 51194 to the internal IP address of the Raspberry Pi device.
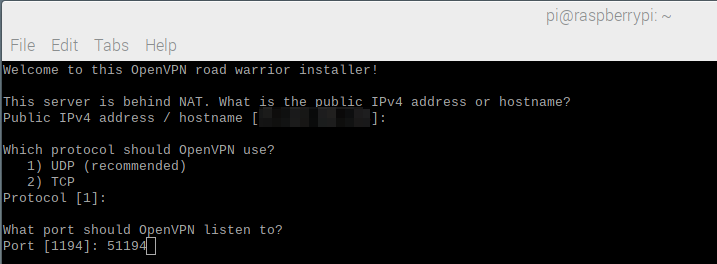
Figure 8 – Selecting the server port
DNS selection
If the remote network has its own DNS that resolves internal domain names, it may be ideal to use the Current System Resolver option for this selection. Otherwise, Google or OpenDNS are reliable alternatives.
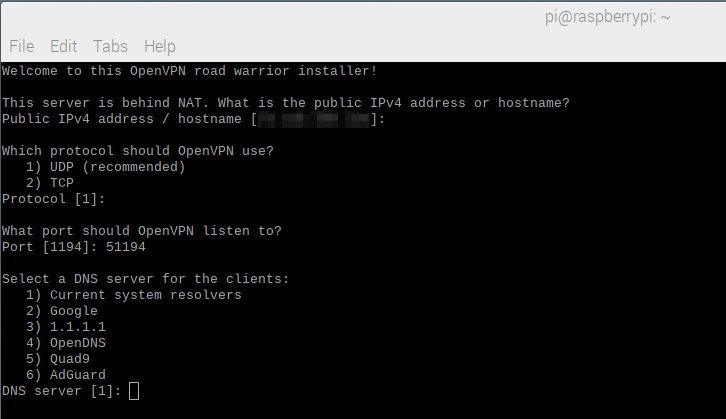
Figure 9 – DNS selection
Name of the first customer
This is a text entry in free form. This is also the name of the OVPN file used by the client for connection purposes. This client will be called “Testing4Pi”.
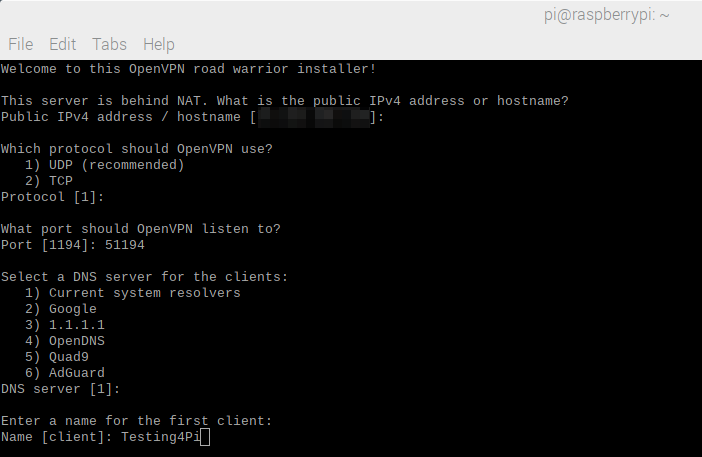
Figure 10 – Name of the first client
After typing and pressing the Enter key, the automated part of the installation begins and ends by itself:
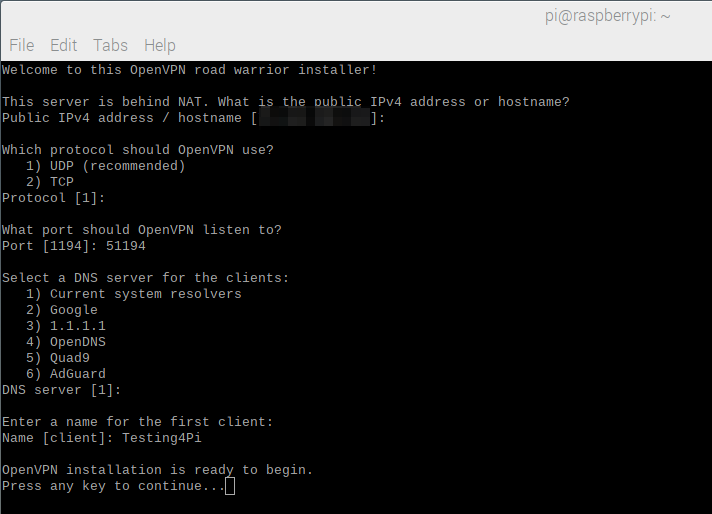
Figure 11 – Before starting the automated part of the installation
Once the process is complete, the updated lengths for the server flow and the client flow can be checked. The server process is in the red circle and the client process is in the blue circle:
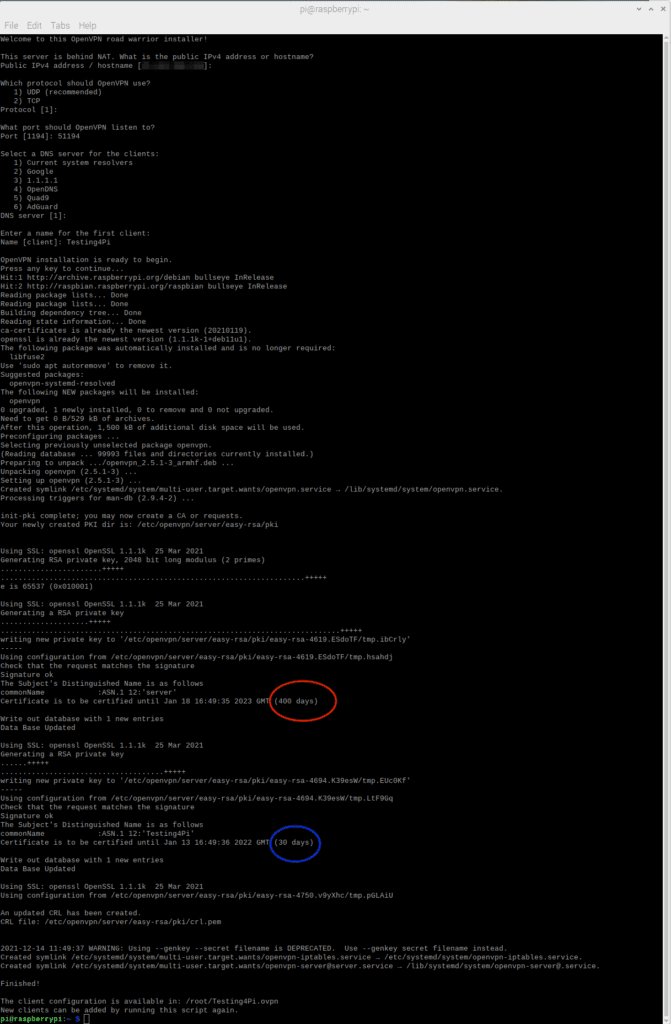
Figure 12 – The completed process with expiration dates highlighted.
Read: Raspberry Pi: Basic input and output
Access to the VPN
Once the process is complete, a client OVPN file will be created in the / root directory of the device. It should be moved to your home directory before being pushed to a client device:
[email protected]: ~ $ sudo mv /root/Testing4Pi.ovpn.
Note that the openvpn-install.sh script can be run repeatedly if more OVPN client files are needed or if the existing ones are running out.
Once the client OVPN file can be accessed, it must be transferred to the device that is using it to connect. An easy way to do this is to copy the file from the server to Google Drive and then use the client to download it from there. The OVPN file can then be imported into an OpenVPN client app on the remote device.
OpenVPN Raspberry Pi server maintenance
Use the sudo systemctl status command [email protected] to check if the service is running. And while it may be tempting to replace the server name in “server.service”, it is incorrect.
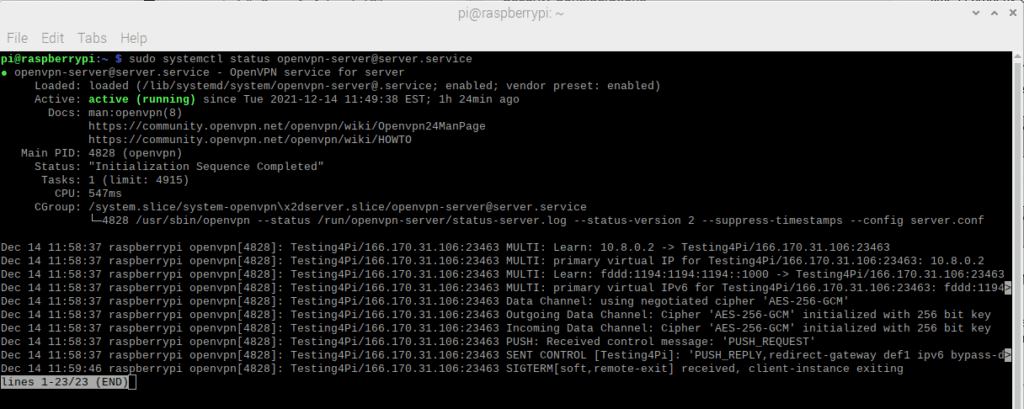
Figure 13 – The server status
Stop the server
The sudo systemctl stop command [email protected] stops the server.
Start the server
The command sudo systemctl start [email protected] starts the server. To restart the server, use restart instead of start. Note that OpenVPN is also activated in the Raspberry Pi operating system when booting. This may not apply to other Linux distributions. The start disposition of this service can be managed like any other systemd-based service.
Revoke access
The openvpn-install.sh script provides an interface for easily revoking access to the server. Just run it as root and you will see the following screen:
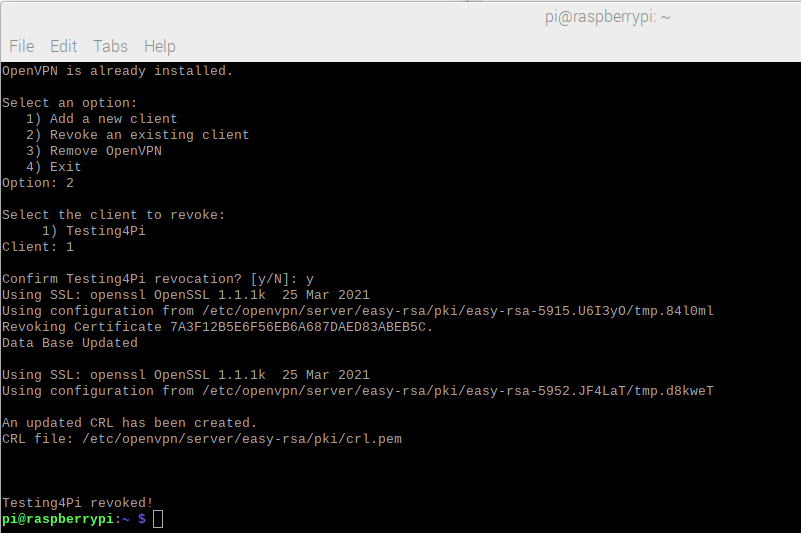
Figure 14 – Revoking Client Access
Use the second menu option, then specify the client you want to revoke. Note that the revocation is irreversible and a client will need a new client OVPN file if access is required again.
Conclusion to the Raspberry Pi OpenVPN Server Tutorial
Both the Raspberry Pi and the Raspberry Pi OS show their extensive utility program with their support for the OpenVPN server. A user with an introductory knowledge of Linux can use this functionality to create a robust and secure OpenVPN server in order to gain access to a private internal network inexpensively, but with maximum benefit.